 Help Center
Task Management
Task Management
Getting Started with Tasks
Page referenced in this article: Tasks page.
The Tasks page is your central place for managing follow-ups, reminders, and action items. Whether you are tracking your own work or coordinating with your team, Tasks helps you stay organized and on schedule.
Open the Tasks Page
Click Tasks in the main navigation to open the Tasks page.
When you open Tasks from the left menu, LeadCenter starts with the Today view by default so you can focus on the most immediate work first.
The page has two main sections:
- Left sidebar — quick views, task lists, and owner filters
- Main area — the task list or Kanban view, plus search, filters, and bulk actions
Use the Sidebar
The sidebar gives you quick ways to focus on the tasks that matter most.
Default Task Views
- Today — tasks due today
- Overdue — tasks with a due date in the past that are not in a completed or cancelled stage
- Upcoming — tasks due in the future
- Inbox — tasks that are not assigned to a task list
Each view shows a count so you can see how many tasks are in that group.
Task Lists
Below the default views, you will see your Task Lists. Click a task list to show only the tasks in that list.
Owner Filter
At the top of the sidebar, use the owner filter to view tasks by:
- All — all task owners
- User — a specific team member
- Team — a specific team
Understand the Task List
The main task list lets you search, filter, sort, and take action on tasks.
Common columns include:
- Task name
- Stage
- Priority
- Owner
- Due date
- Category
- Task list
Each task row shows the task's current stage with a small color indicator so you can quickly see where work stands. The exact columns you see may vary depending on your view and screen size.
Use Custom Task Stages
LeadCenter lets your organization define custom task stages so your team can track work using the terms that fit your workflow. Each stage belongs to one of four built-in task statuses: Not Started, In Progress, Completed, or Cancelled.
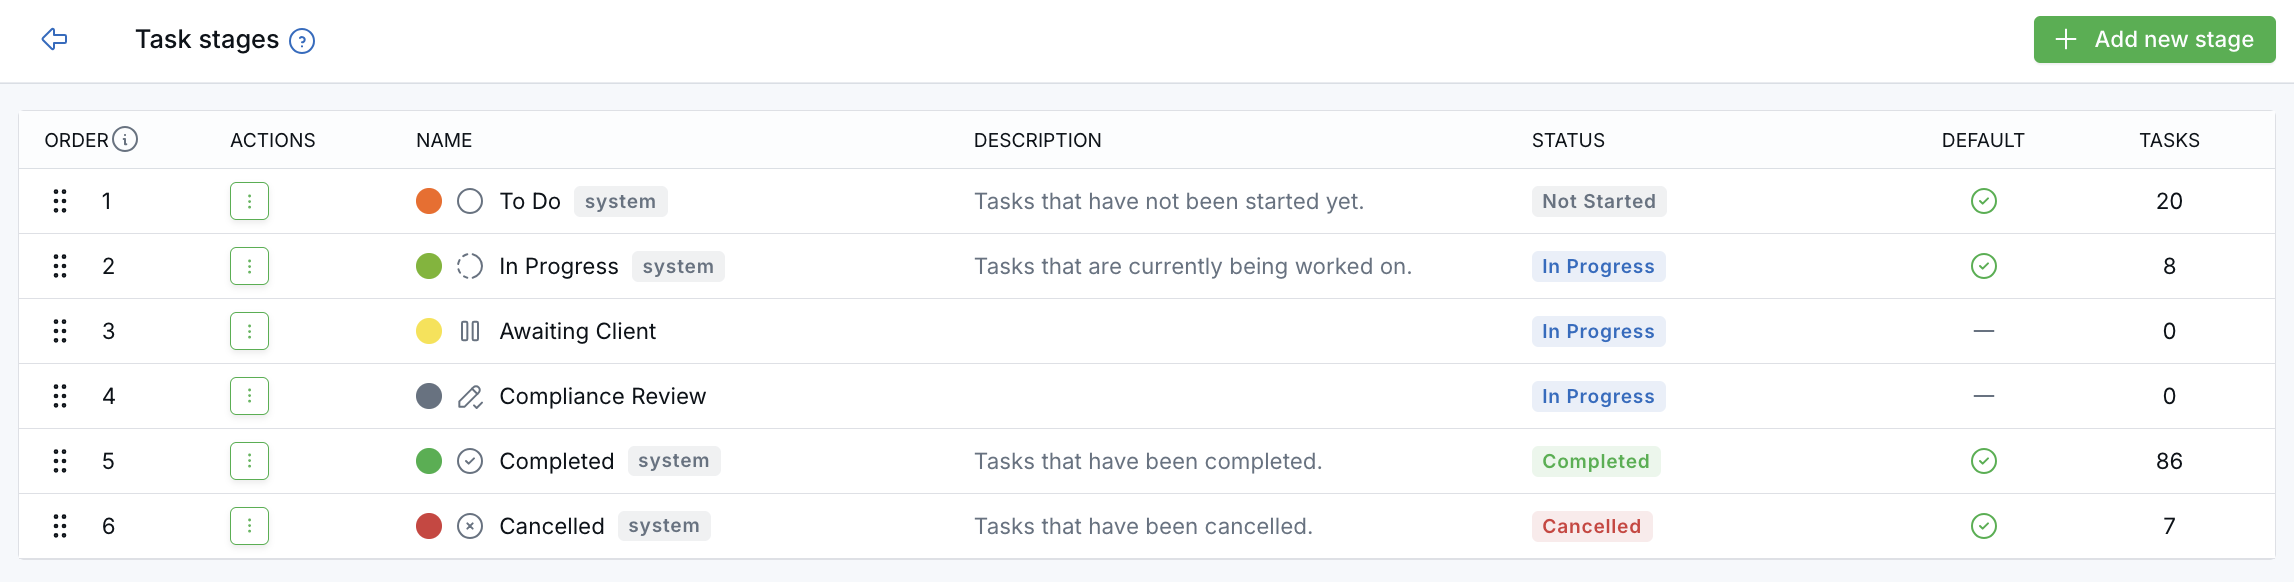
This gives your team more detail without changing how built-in statuses work for reporting, workflows, and integrations.
Manage Your Task Stages
- Go to Settings > Database Lists > Other Lists > Task stages.
- Click Add stage.
- Enter the Name and, if needed, a Description.
- Select the built-in Status the stage belongs to.
- Choose a Color and Icon.
- If needed, turn on Default stage for this status.
- Click Save.
Each built-in status must always have one default stage. New tasks, including tasks created by workflows or integrations, start in that default stage.
A stage's built-in status cannot be changed later. If you need it under a different status, create a new stage and move the tasks there.
Reorder, Edit, or Delete Stages
- Reorder stages — Drag stages up or down on the Task stages settings page. This controls the order of Kanban columns, stage filters, and change-stage menus.
- Edit a stage — Update the name, description, color, icon, or default setting.
- Delete a stage — Remove a stage if it is no longer needed.
A stage cannot be deleted if it still has tasks assigned to it, if it is the last stage for its status, or if it is a protected system stage.
Use the Kanban View
You can manage tasks in either the standard list or the Kanban view. Kanban organizes tasks into columns based on stage, making it easy to see progress and move work forward.
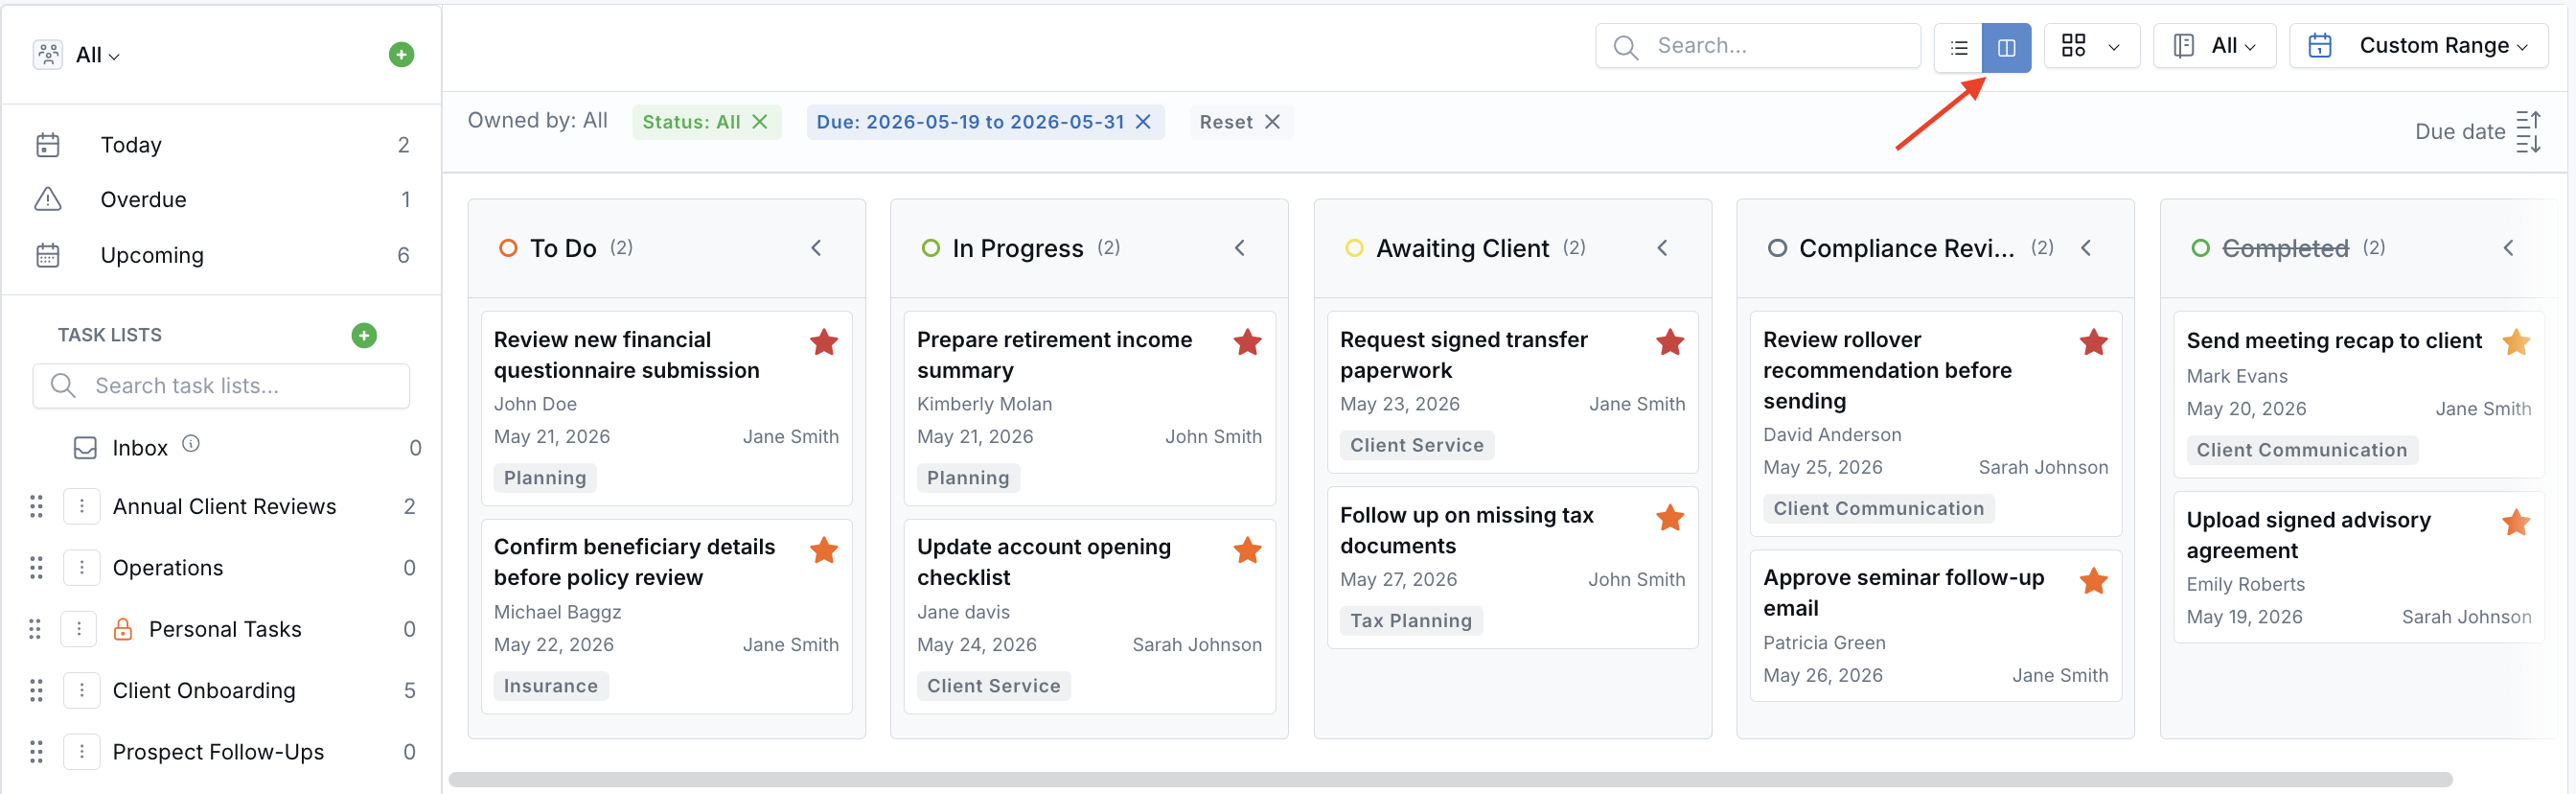
- Open the Tasks page.
- Click Kanban next to the List view option.
- Review tasks by stage using the column layout.
- Drag a task card to a different column to change its stage.
How Kanban Works
- Each visible stage appears as its own column.
- The count in each column header shows how many tasks are currently in that stage.
- Dragging a task to another column updates its stage.
- Tasks moved into a completed or cancelled stage keep the correct status behavior in LeadCenter.
- You can collapse columns you do not want to focus on, and LeadCenter remembers collapsed columns.
- Each column loads more tasks as you scroll, which helps large task sets stay manageable.
How Filters Affect Kanban
Kanban respects the same filters you use on the task list, including owner, due date, task list, contact, and scope. Visible columns also adjust based on your status filter.
- All — shows every stage
- Open or Pending — shows only active stages
- Overdue or Due Today — hides completed and cancelled stages
- A specific stage — narrows the list while still letting you move tasks into other visible stages
Use the Group by Workflow View
The Group by Workflow view organizes tasks by the workflow they belong to and the workflow step that created them. Use this view when you want to review workflow-related work by process instead of by task list or stage.
- Open the Tasks page.
- Use the view toggle in the page header.
- Select Group by Workflow.
Your last selected task view is remembered in your browser.
How the View Is Organized
- Workflow groups — Tasks are grouped under the workflow they belong to.
- Workflow step groups — When available, tasks are grouped by the workflow step that created them.
- Tasks not tied to a step — Tasks linked to a workflow but not a specific step appear in their own group.
- Not part of any workflow — Tasks without a workflow appear in a separate group.
Working in the Grouped View
- Use the chevron or header row to collapse or expand workflow and step groups.
- Use Expand all or Collapse all when available in the filter bar.
- Hover over workflow or step details to review more context when available.
- Select task checkboxes to use the bulk actions bar.
- Open a task to review or edit it in the task details panel.
Filters and Loading
The Group by Workflow view uses the same task filters as the other task views, including search, owner, status or stage, category, due date, and scope.
Each group loads tasks in batches. Use Load more or scroll near the bottom of a group when more tasks are available.
Workflow grouping is for reviewing and managing tasks. Workflow association is set by the workflow that created or controls the task.
Filter Tasks by Stage
The Status filter includes both built-in statuses and your custom task stages.
- On the task list, click Status.
- Find the Stage section in the filter.
- Select the stage you want to view.
- Review the filtered list of tasks.
Status and stage filters work separately. Choosing a built-in status clears a selected stage, and choosing a specific stage clears the built-in status filter.
Change a Task's Stage
You can update a task's stage from several places in LeadCenter:
- Task form — choose a stage while creating or editing a task
- Task row actions — use the row menu to change stage
- Task details panel — open the task and update the stage there
- Kanban view — drag the task to a new stage
- Bulk actions — select multiple tasks and change their stage at once
When you move a task to a different stage, LeadCenter automatically keeps the related built-in task status aligned.
Use the Task Details Panel
When you click a task from the task list, Kanban view, a contact record, a company page, or a shared task link, LeadCenter opens the Task details panel on the right side of the page.
The panel helps you review the task, update key details, work with documents, and add comments without leaving your current page.
Review Task Details
- Task title: The panel header shows the task name. Recurring tasks also show a recurring icon.
- Copy options: Use the copy icon to copy the task link or task title.
- Task actions: Use the actions menu to edit the task, change its stage, delete it, or use other available task actions.
- Task information: Details appear in a compact grid. LeadCenter only shows rows that apply to the task, such as task list, appointment, contact, priority, due date, owners, account, or workflow.
Work with Documents
The Documents section shows the number of documents attached to the task.
- Image thumbnails: Image files appear as thumbnails. Click a thumbnail to preview it in a pop-up.
- Document table: Attached documents are listed with their actions, privacy icon, name, category, and date added.
- Hide or show documents: When the task has documents, use Hide or Show to collapse or expand the document area.
- Upload document: Upload a document from the panel. After upload, LeadCenter refreshes the document list without closing the panel or reloading the page.
- Row actions: Use the three-dot menu on a document row to preview, download, edit, or delete the document.
Add Comments
Use the comments area below documents to add and review task comments.
- Use rich text formatting such as bold, italic, lists, tables, and links.
- Use @mentions to notify a team member when needed.
- Use the pencil or trash icon to edit or delete your own comments.
Copied task links open the Tasks page and automatically open the details panel for that task.
Use the Actions Menu
In the top-right corner of the Tasks page, click Actions to access:
- Create task
- Create task list
- Task templates
- Download CSV
Create Your First Task
- Click Actions.
- Select Create task.
- Enter the task details.
- Choose the task's stage, if needed.
- Click Save.
You can also create a task from other places in LeadCenter, such as a contact record. When you create a task from a contact, the task is automatically linked to that contact.
Create Your First Task List
Task lists help you organize related tasks together. For example, you might create lists for:
- Client Onboarding
- Weekly Follow-Ups
- Marketing Projects
- Operations Tasks
- Click Actions.
- Select Create task list.
- Enter the task list name.
- Click Save.
Once created, the task list appears in the sidebar.
Create or Link a Task with Contacts
You can create tasks directly from a contact record or link contacts to a task from the main Tasks page. This helps you keep follow-ups, reminders, and action items connected to the people they relate to.
If a task applies to more than one contact, you can link additional contacts to the same task. The task will appear where it is relevant, so your team can see the follow-up from each related contact record.
Create a Task from a Contact
- Open the contact's details page.
- Open the Tasks section or tab on the contact record.
- Click + Create Task.
- Enter the task details, including the owner, due date, priority, category, and task list if needed.
- Add any additional related contacts, if needed.
- Click Save.
After saving, the task appears on the contact record and on the Tasks page. From there, you can manage it like any other task.
Tasks created from a contact are linked automatically. If the task should also be connected to other contacts, add those contacts before saving or edit the task later.
Link Additional Contacts to a Task
- Open the task you want to update.
- Find the contact field on the task.
- Add the additional contacts that should be connected to the task.
- Review the task details.
- Click Save.
Once saved, the task remains one task, but it is connected to each selected contact. This is helpful when one follow-up involves multiple people in the same household, business, or opportunity.
Where Linked Tasks Appear
- On the main Tasks page
- On the related contact record
- In contact task views where the task is connected to that contact
Important Notes
- A task can be connected to one or more contacts.
- Updating the task updates the same task for all linked contacts.
- Removing a contact from the task only unlinks that contact from the task. It does not delete the task.
- Deleting or completing the task affects the task itself, not just one contact's view of it.
Quick Actions from a Task
Each task row includes a menu with quick actions such as:
- Change stage
- Edit
- Reschedule
- Assign owner
- Move to list
- Duplicate
- Upload document
- Delete
These contact-related actions are available only when the task is linked to a contact. If the task is standalone, you can still manage the task itself, but contact actions such as Call, Send email, Send text, and Create appointment will not appear.
If the task is linked to a contact, you may also see actions such as:
- Call
- Create appointment
- Send email
- Send text
Best Practices
- Start each day with the Today view to focus on immediate work.
- Use custom stages that reflect real workflow steps instead of creating too many similar stages.
- Keep one clear default stage for each built-in status.
- Use task lists to group repeatable processes and ongoing projects.
- Review overdue tasks regularly so older work does not pile up.
Frequently Asked Questions
What is the difference between a stage and a status?
A stage is the more specific step your team uses to track work. A status is the built-in task grouping behind that stage: Not Started, In Progress, Completed, or Cancelled.
Will my existing tasks keep working after stages are added?
Yes. Existing tasks keep their current built-in status and are placed into the default stage for that status. Reports, workflows, and integrations continue to work.
Can I move a stage to a different built-in status later?
No. A stage's built-in status is fixed after creation. If you need to change it, create a new stage under the correct status and move tasks there.
Why do completed and cancelled columns disappear in some Kanban filters?
Kanban hides columns that do not apply to the active filter. For example, completed and cancelled stages are hidden in views such as Overdue and Due Today.
Why does the task details panel show both Stage and Pipeline Stage?
Stage is the task's own stage. Pipeline Stage refers to the related contact's pipeline stage. They are separate fields.
Can I update several tasks to the same stage at once?
Yes. Select multiple tasks from the task list and use the bulk action bar to change their stage in one action.

Need more help?
If you can't find the answers you're looking for, our support specialists are available to answer your questions and troubleshoot if necessary.
-
Phone Call (888) 291-7116. Our main hours are Monday to Friday 7 am-5 pm Central Time.
-
Support Send your questions and inquiries via email to support@leadcenter.ai. A support ticket will be created and one of our team members will get back to you as quickly as possible.