Lead Capturing & Tracking
Capturing Leads from Website Forms
* Page referenced in this article: website forms integration page.
With LeadCenter, you can capture form submissions as leads and contacts without the need for manual entry in your CRM.
The following are the steps required
- Add the javascript code to your website.
- Add website domain to LeadCenter.
- Add the form to LeadCenter.
- Map the form fields to LeadCenter fields.
- Activate the form.
- Test it.
1. Add the javascript code to your website
The following are the steps to add the javascript to your website:
- Click on Javascript code button at the upper right corner of the page.
- Copy the code in the black box and close that Javascript dialog box.
- Add the script to your website or send it to the developer managing your website to add it. You can added in the header tag or just before closing of the body tag.
If your website runs on WordPress, check this article for how to add javascript to your website. The same concepts apply to other website platforms.
2. Add your website domain to LeadCenter
Click on Add Domain button on upper right corner of the page. Enter your domain URL. Enter the domain name without http or https prefix. For example, if your domain URL is https://contosowealth.com, Enter contosowealth.com.
3. Add the form to LeadCenter
- Click on Register New Form green button on the upper right corner.
- Fill a form title to easily identify it in LeadCenter.
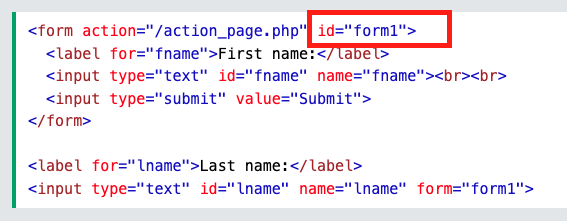
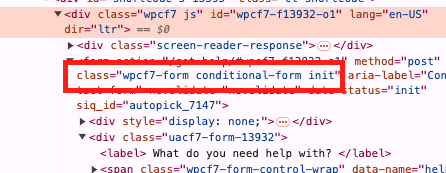
- Fill the Form ID or CSS Selector. You can get this information from your website form.
- Optionally, you can enter additional tracking fields to track where the lead came from. Check below for more details.
- Click Save button
Here is an example of a Form ID For example if the Form ID is contactForm, enter #contactForm. Form ID is the recommended way to connect the form.
Here is an example of a CSS Selector For example if the CSS Selector is wpcf7-form, enter .wpcf7-form. Don't forget the dot at the start.
The form is now added to the forms list in LeadCenter. The next step is to map the fields
4. Map the form fields to LeadCenter fields
You should map Leadcenter contact fields with the fields from your form. Currently, the following system fields can be mapped:
First Name, Last Name, Full Name, Email, Phone, Company, Enquiry, Primary Notes, Street Address, City, State, Zipcode, and country. Also you can map Custom Fields
Follow these steps to do the mapping:
- Click on the white Actions button at right of the form entry, then click Fields Mapping.This will open the Field Mapping page.
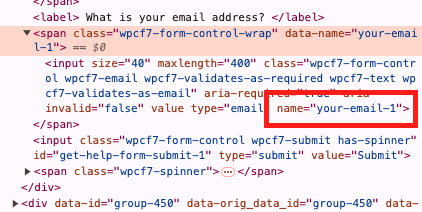
- In your website form, find the field name you want to map. and copy it. Then paste it in the right input box in the Field Mapping page.
For example, if the field you want to map is email, the input field name in this example is your-email-1
 . So you have to enter your-email-1 in the email input box in LeadCenter field mapping page.
 - After you fill all the desired fields, click Save.
5. Activate the form
The forms page, click on the form Actions menu and click Activate. Now the form capturing is activated
6. Test lead capturing using forms
To test the settings you just completed, go to your website, fill out that form and submit it, The lead should be captured and it will show in the Sales Pipeline Dashboard.
If you need assistance, please send an email to support@leadcenter.ai.
Tracking Information
You can track form submission campaigns using website URL UTM parameters or by adding Tracking fields to each form that can help with tracking where the lead came from:
Important: We recommend using UTM paramters in your website pages URL. Using manual fields in this form may not provide accurate results. For more information, please consult with a digital marketing agency. Check this article: URL builders: Collect campaign data with custom URLs for more information about the subject.
If you select to add the tracking fields manually, you can add the following fields: Campaign Source, Campaign Name, Campaign Term, Campaign Term, and Campaign Content.

Need more help?
If you can’t find the answers you’re looking for, our support specialists are available to answer your questions and troubleshoot if necessary.
-
Phone Call (888) 291-7116. Our main hours are Monday to Friday 7 am-5 pm Central Time.
-
Support Ticket Send your questions and inquiries via email to support@leadcenter.ai. A support ticket will be created and one of our team members will get back to you as quickly as possible.
