 Help Center
AI Agents
AI Agents
In person meeting (Claudia AI)
In-Person Meeting Recording allows you to capture face-to-face meetings directly from your computer, upload a meeting file you already recorded elsewhere, or use the LeadCenter mobile app. Claudia AI processes the meeting so you can review the transcription later instead of relying only on manual notes.
After the meeting ends, you can review the transcription anytime to recall key details, decisions, and next steps.
Beta Feature: This feature is currently in beta. You may experience minor issues as we continue improving it. If something doesn’t work as expected, please contact support.
Recording Options
You can capture in-person meetings in three ways:
- Desktop (Web Browser) — Record live directly from your computer.
- Upload pre-recorded — Upload a meeting file you already recorded somewhere else, such as a voice memo or video export.
- Mobile App (Quick Meeting) — Record directly from the LeadCenter mobile app, including offline support.
Desktop (Web) Recording
Requirements
Before recording from desktop, make sure you have:
- A computer with a microphone (built-in or external)
- A supported web browser (Chrome recommended)
- Microphone permission enabled in your browser
Supported Browsers
- Google Chrome — Recommended
- Microsoft Edge
- Mozilla Firefox
Note: Safari may have limited compatibility.
How to Start a Desktop Recording
You can start a live recording in three ways:
Option 1: From the Top Navigation (In person meeting (Claudia AI))
- Click the In person meeting (Claudia AI) button in the top navigation bar.
- A new tab opens with the recording page.
Option 2: From a Contact Record
- Go to Contacts.
- Open the contact you are meeting with.
- Click the AI assistant dropdown.
- Select In person meeting (Claudia AI).
The contact will automatically be linked to the recording.
Option 3: From an Appointment
- Go to Calendar.
- Open the appointment.
- Click Actions.
- Select Record meeting (Claudia AI).
If the meeting type is set to In person or Other, a Record meeting button may appear directly in the appointment view.
Upload a Pre-Recorded Meeting
If you already have a meeting file saved on your computer, you can upload it instead of recording the meeting live again. This is useful for recordings captured outside LeadCenter, such as a phone voice memo, exported audio file, or video file.
Use live recording when you are about to meet someone and want Claudia to capture the meeting from your microphone. Use Upload pre-recorded when the meeting already happened and you already have the file.
How to Start an Upload
- Open the same area you use for In person meeting (Claudia AI).
- Click Upload pre-recorded.
- Enter the meeting details, including title, optional description, and start and end time.
- Search for and select the main contact if there is one.
- Optionally add guest emails and attendees from your company.
- Choose the recording file and continue with the upload steps shown on the page.
Note: If you do not link a contact, LeadCenter treats the upload as an internal meeting.
File Size
The upload page shows the largest file size allowed for one upload for your account. If the file is larger than the limit shown on your screen, you may need to trim it before uploading.
What Happens After You Upload
- LeadCenter accepts the file and begins processing it.
- Longer or larger files take longer to prepare.
- When processing finishes, the meeting can produce the same types of Claudia results your team has enabled, such as a transcription and other meeting outputs.
- If you do not see the results yet, wait a few minutes and refresh the contact or appointment.
Understanding the Recording Page (Desktop)
Meeting Recording Panel
- Meeting Title — Editable using the pencil icon
- Status Indicator — Ready, Recording in progress, Processing, or Completed
- Session — Shows how long the recording tab has been open in recording mode
- Audio captured — Shows how much audio has actually been saved
- Start/Stop Button — Controls the recording
Use Audio captured as the true saved duration. If the session time and audio captured time are different, part of the meeting may not have been recorded.
Participants Panel
You can associate the recording with:
- Contact — The primary client or prospect
- Guest Emails — External participants not in your CRM
- Attendees from Your Company — Internal team members
Click Save after adding participants.
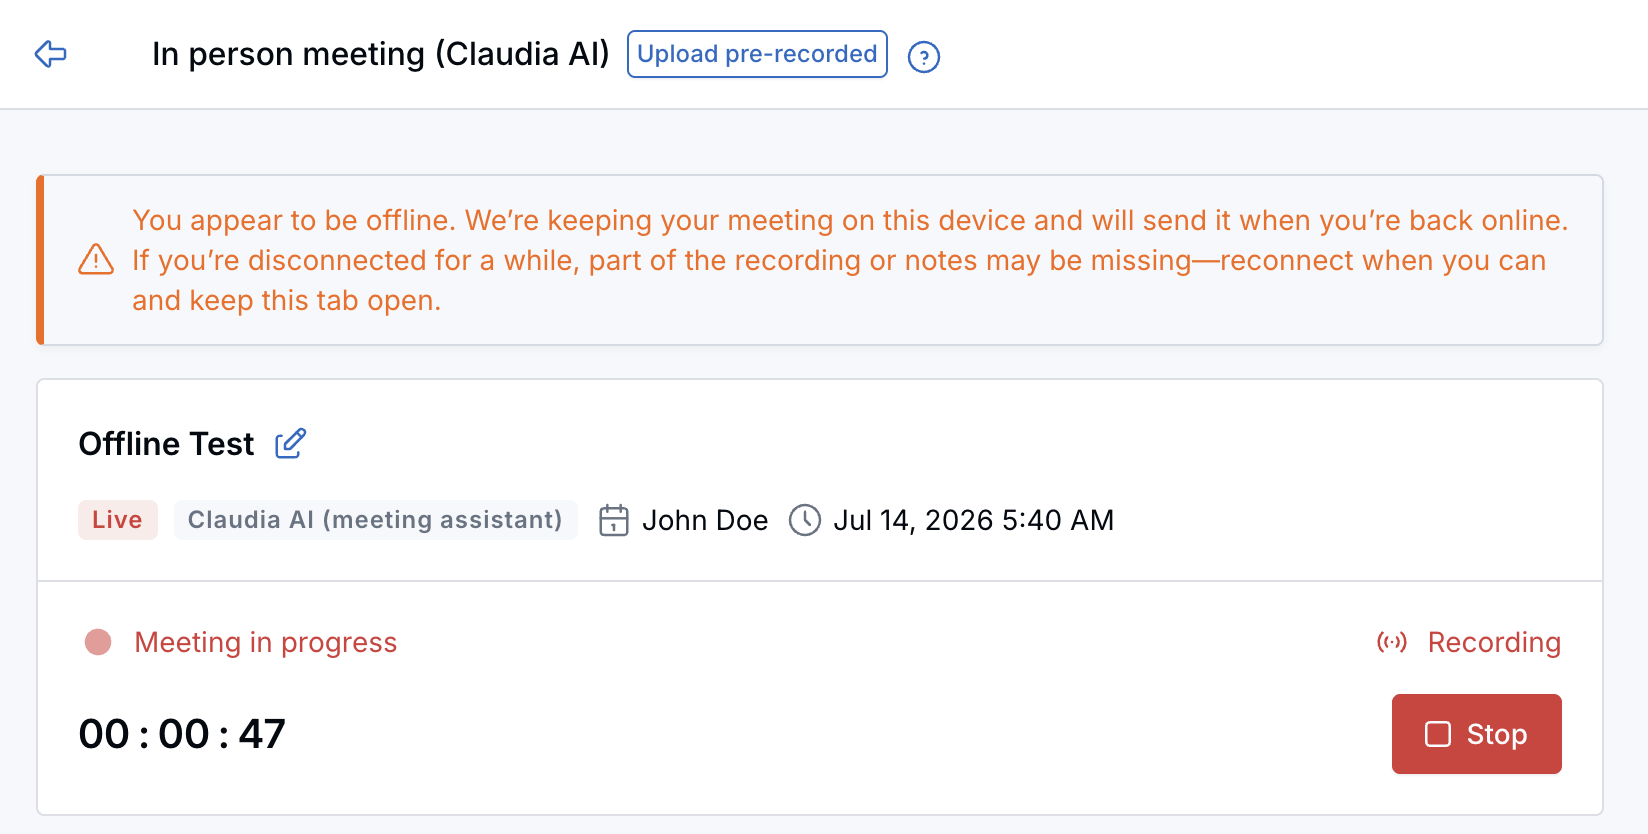
Recording Health Warnings for Desktop Recordings
When you record an in-person meeting from your browser, the recording page warns you if the browser may not be capturing audio correctly.
Warnings You May See
- This tab is in the background means the recording tab is not visible. Switch back to the recording tab as soon as possible.
- Recording paused - audio is not being captured means no new audio has been received for about 30 seconds. Return to the tab, keep it in the foreground, and disable Battery Saver if you are using Windows.
- This recording was ended on the server means the system finalized a stalled recording while the tab was still open. Only the audio captured up to that point was saved.
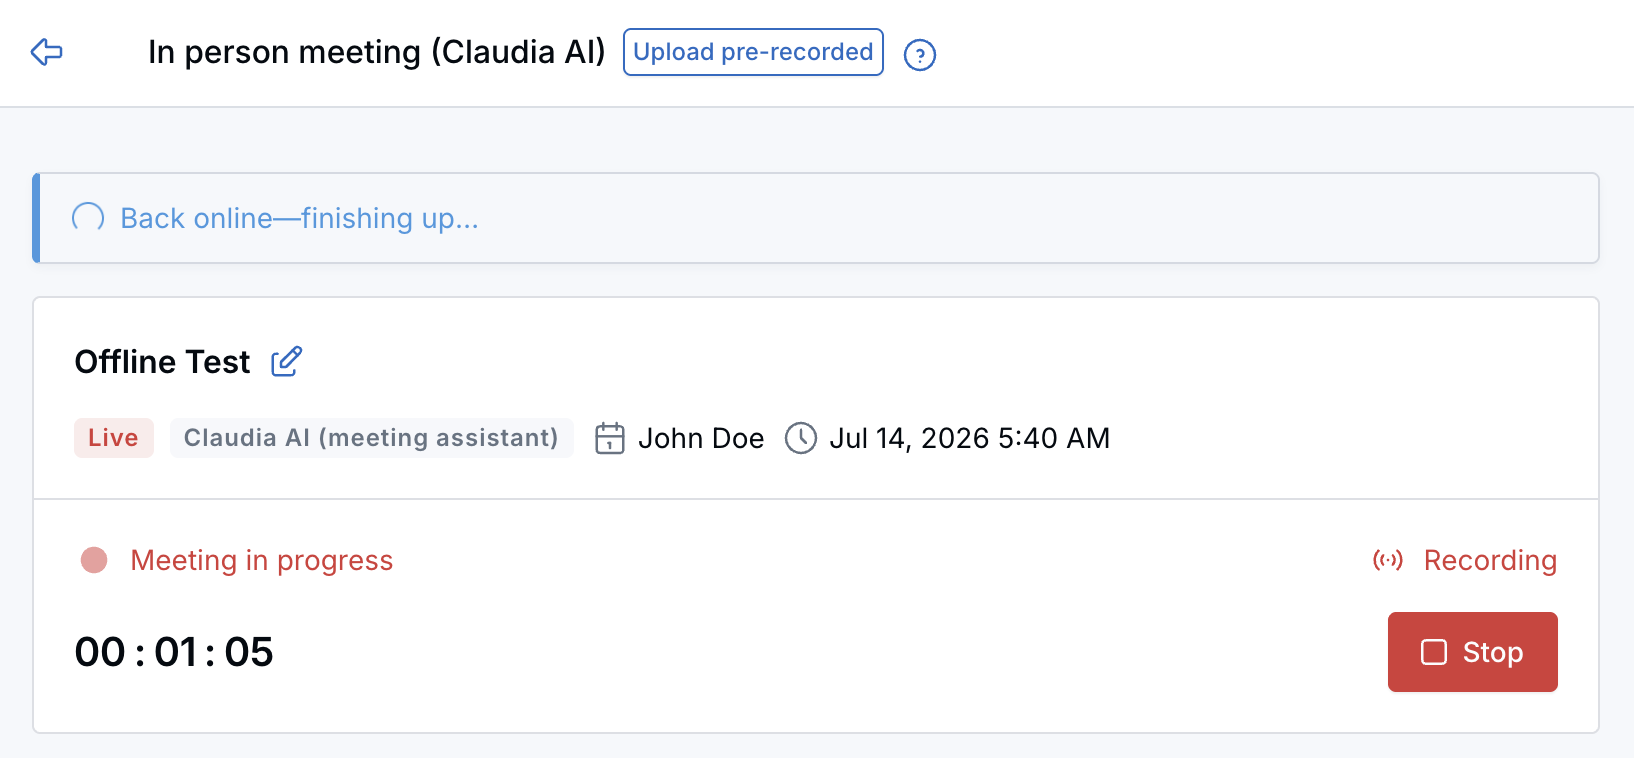
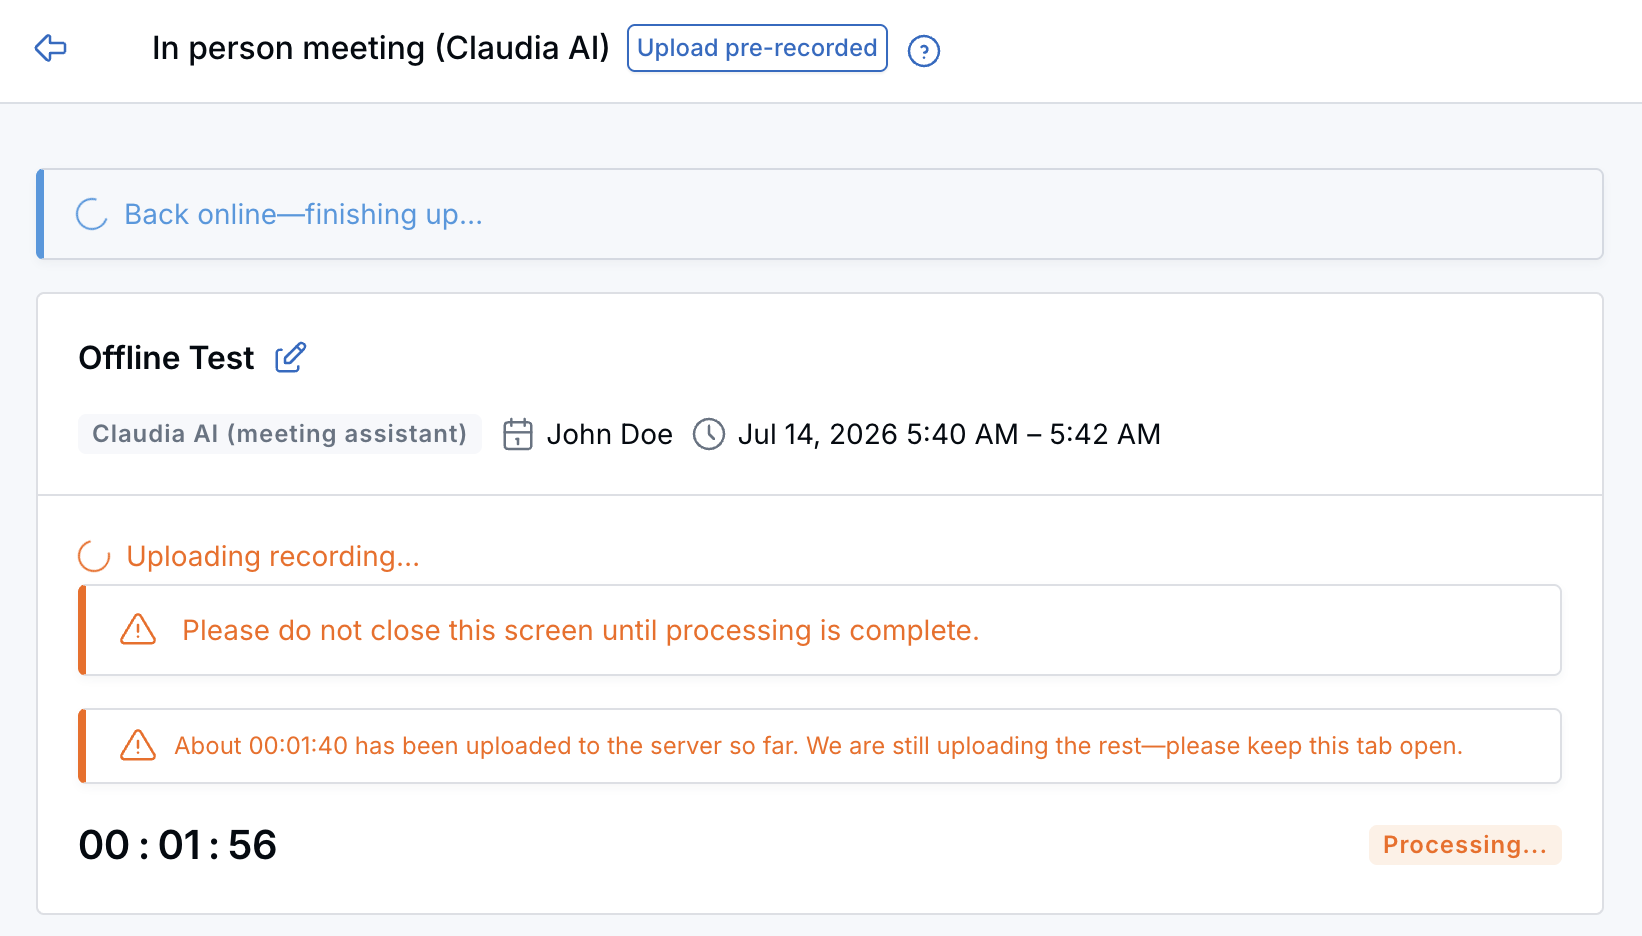
- Offline / slow connection means uploads are delayed. Keep the tab open until processing finishes.
Best Practices
- Keep the recording tab open and in the foreground for the full meeting.
- Use Google Chrome on a desktop or laptop when possible.
- Turn off Battery Saver and avoid heavy multitasking during long meetings.
- Do not lock the screen or switch apps for extended periods while recording.
- If capture stalls and does not recover, stop the recording and start a new one.
In-browser recording depends on your browser and operating system. If the tab is backgrounded, the device sleeps, Battery Saver is active, or the internet connection is unstable, audio capture may be interrupted.
Recording a Meeting (Desktop Step-by-Step)
1. Start Recording
- Click Start recording.
- Allow microphone access when prompted by your browser.
- Recording begins immediately and the timer starts.
2. During the Meeting
- You can edit the meeting title.
- You can update participants.
- The recording continues uninterrupted.
3. Stop Recording
- Click Stop recording.
- Wait while the system processes the recording.
- Status changes to Recording completed when finished.
After completion, Claudia AI automatically begins generating the transcription. You can close the tab while processing continues in the background.
Mobile App Recording (Quick Meeting)
You can also record in-person meetings directly from the LeadCenter mobile app using Quick meeting. This is ideal when you are meeting in person and want a fast, reliable audio recorder.
Key Benefits of Mobile Recording
- Works offline — Recording continues even if internet connection drops
- Live waveform visualization
- Automatic cloud sync when connection is restored
- Link to contacts or appointments
How to Start a Mobile Recording
Option 1: From the Main Navigation
- Tap the floating + button at the bottom center of the screen.
- Select Quick meeting.
- The recorder opens immediately.
Option 2: From an Appointment
- Open Calendar in the mobile app.
- Tap an appointment.
- Tap Quick meeting.
The meeting will automatically link to that appointment.
Option 3: From a Contact
- Open Contacts in the mobile app.
- Select the contact.
- Tap Quick meeting.
The meeting will automatically link to that contact.
Recording a Meeting (Mobile Step-by-Step)
- Tap Start to begin recording.
- Status changes to Live and the waveform animates.
- The timer displays meeting duration.
- You may add participants by tapping the participants section.
- Tap Done to finish recording.
If your connection drops, recording continues locally. Audio segments upload automatically when internet access is restored.
Viewing the Meeting Transcription (Desktop & Mobile)
Processing Time
Transcriptions typically take a few minutes depending on meeting length. Longer meetings require more processing time.
How to View the Transcription
- Open the associated Contact.
- Go to the Appointments tab.
- Locate the recorded or uploaded meeting.
- Click or tap the three-dot menu (⋮).
- Select View Transcription.
A panel opens displaying the full conversation, organized by speaker.
Tips for Best Results
Before the Meeting
- Test your microphone beforehand.
- Choose a quiet location.
- Place your device close enough to capture all voices clearly.
During the Meeting
- Speak clearly and at a normal pace.
- Avoid talking over each other.
- Minimize background noise.
Troubleshooting
Microphone Permission Issues
If recording does not start, ensure microphone access is enabled in your browser (desktop) or in your device settings (mobile app).
Upload Processing Delays
- Larger files take longer to process.
- If the upload seems stuck, wait a few minutes and refresh the contact or appointment.
- If the file is larger than the allowed limit shown on the page, trim it and try again.
No Transcription Available
- The recording may still be processing.
- The recording may have been too short.
- The audio quality may have been insufficient.
Deleting a Recording
If you need to delete a recording, please contact support@leadcenter.ai.
Need Help?
If you experience issues or have questions about in-person meeting recording, contact support@leadcenter.ai.

Need more help?
If you can't find the answers you're looking for, our support specialists are available to answer your questions and troubleshoot if necessary.
-
Phone Call (888) 291-7116. Our main hours are Monday to Friday 7 am-5 pm Central Time.
-
Support Send your questions and inquiries via email to support@leadcenter.ai. A support ticket will be created and one of our team members will get back to you as quickly as possible.