 Help Center
Set Up Your Account
Set Up Your Account
DMARC Security
| Where to find it | Settings → Basic settings → Shared email account → LC email marketing → Sending domain → DNS records Open Shared email account |
|---|---|
| Who can do this | By default, Owners, Admins, and Editors, plus someone who can edit your domain’s DNS settings. |
| Before you start | A sending domain added in LeadCenter, and access to your DNS provider. |
| Time needed | About 5 minutes, then up to 48 hours for DNS changes to take effect. |
DMARC stands for Domain-based Message Authentication, Reporting, and Conformance. It tells mailbox providers what to do with email that claims to come from your domain but fails authentication checks. In practice, it is what stops scammers from sending email that looks like it came from your firm.
LeadCenter generates the DMARC record for you and includes it with the DNS records for your sending domain. This article explains what it does and how to add it.
Most firms only need to add the record LeadCenter gives you and leave it at p=none. Changing the policy later is optional and best done with your IT provider.
How DMARC Works
Every email sent from your domain is checked against two authentication standards, SPF and DKIM. DMARC is the pass/fail policy layered on top: it tells the receiving mailbox what to do when a message fails those checks. The options range from “do nothing” through “quarantine it” to “reject it outright.”
DMARC and your custom sending domain go together. If your domain already has a strict DMARC policy and you have not set up a custom sending domain in LeadCenter, your LeadCenter email will fail the policy check and be sent to spam or rejected. Set up your custom sending domain first. See Email Custom Sending Domain.
Where to Find Your DMARC Record
- Click your name or profile picture in the top-right corner and select Settings.
- Open the Basic settings tab.
- Click Shared email account.
- Select LC email marketing.
- In the Sending domain card, click the three-dot menu on your domain and choose DNS records.
In the records table, look for the row with type TXT and host
_dmarc. That is your DMARC record.
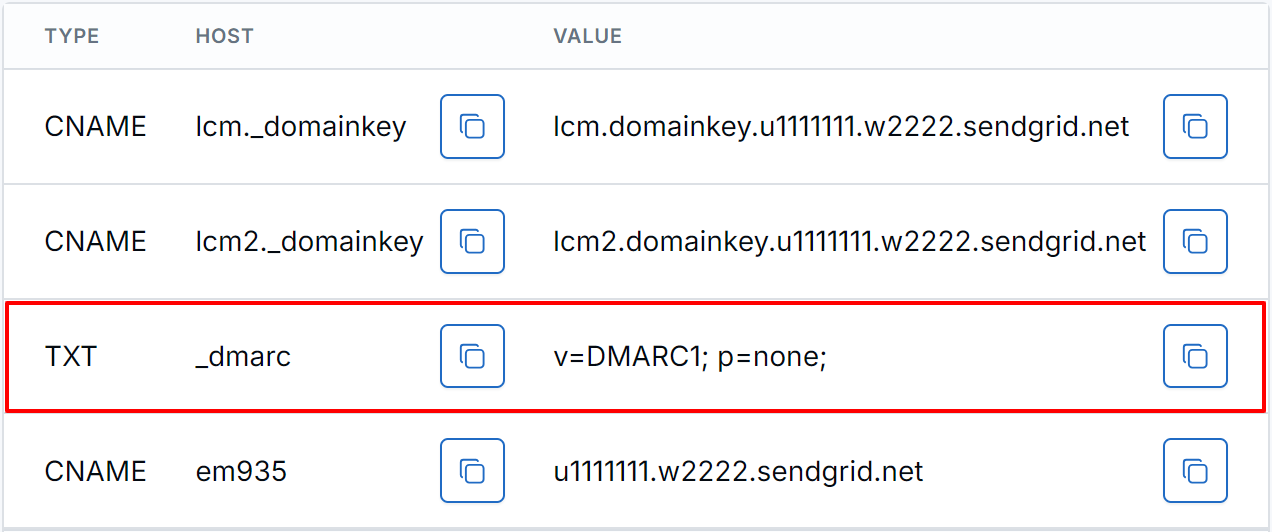
Your DMARC record is the TXT row with host _dmarc.
| Type | Host | Value |
|---|---|---|
| TXT | _dmarc |
v=DMARC1; p=none; |
How to Add It
- Use the copy buttons in the DNS records table to copy the host and the value exactly.
- Add the record at your DNS provider, alongside the other records for your sending domain. Step-by-step instructions for each major provider are in Adding DNS Records Made Easy: Email, Landing Pages, FQ & SSL.
- Return to LeadCenter and click Verify Domain.
Already have a DMARC record? Keep it and do not add the one LeadCenter shows. A domain can only have one DMARC record, and two break authentication. LeadCenter accepts any existing DMARC record, whatever its policy.
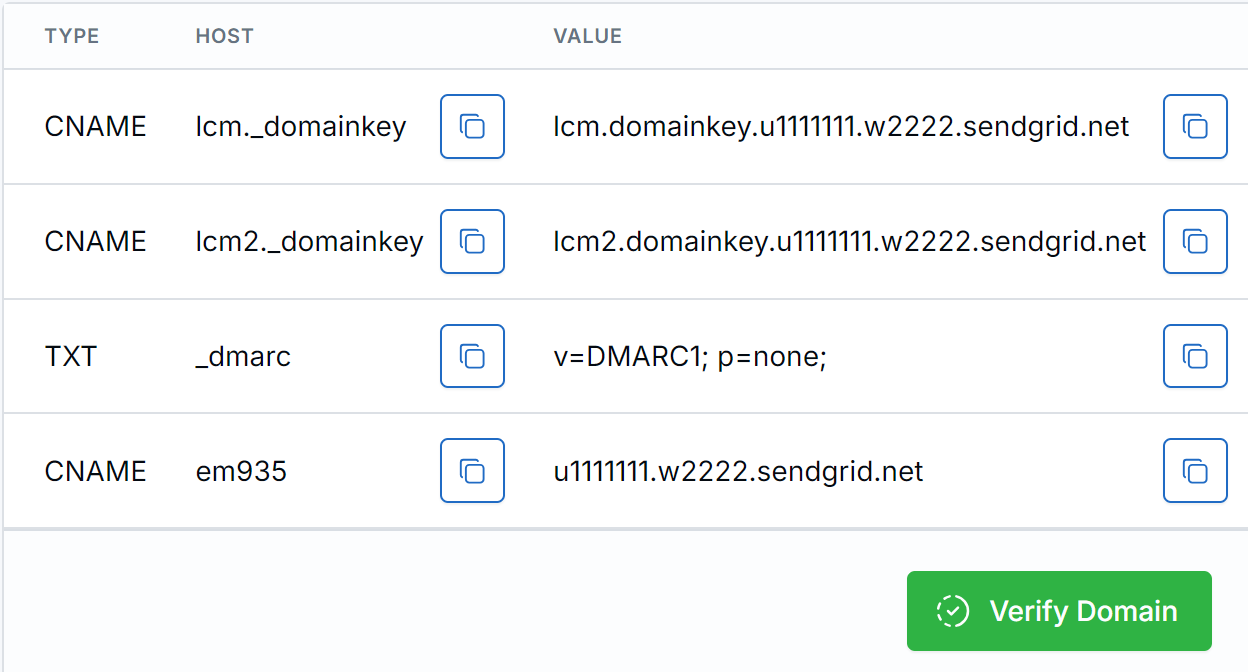
Click Verify Domain after you add the records.
If the DMARC record is missing, verification reports that no DMARC record was found for your domain. That message means the record has not reached your DNS yet. Either it was not saved, or it is still propagating.
Keep the leading underscore. The host must be _dmarc, not
dmarc. Some DNS interfaces strip the underscore. Re-open the record after saving and
confirm it is still there.
What p=none Means, and When to Change It
The record LeadCenter provides uses p=none. This is the monitoring level: mailbox
providers report on failures but still deliver the mail. It is deliberately the safest starting
point, because a stricter policy applied before all your legitimate senders are authenticated will
block your own email.
Once your custom sending domain is verified and you are confident every service that sends on your behalf is properly authenticated, you can tighten the policy in stages:
| Policy | What receiving mailboxes do with failing email |
|---|---|
p=none |
Deliver it, and report on it. The safe starting point. |
p=quarantine |
Send it to spam. The usual second step. |
p=reject |
Refuse it entirely. The strongest protection against spoofing. |
Do not jump straight to p=reject. Your domain probably sends through more services
than you realize: your email provider, your CRM, your accounting software, your scheduling
tools. Any of them that is not properly authenticated will have its email rejected. Move to
p=quarantine first, watch for a few weeks, and only then consider
p=reject. If your firm has an IT provider, involve them in this decision.
Best Practices
- Add the DMARC record with your other sending-domain records. It is in the same table and goes to the same place.
- Start at p=none and stay there for a few weeks. You get reporting with no risk of blocking your own mail.
- Never create a second DMARC record. A domain can only have one. Two records break authentication entirely.
- Involve your IT provider before tightening the policy. Quarantine and reject affect every system that emails as your domain, not just LeadCenter.
Troubleshooting
Verification says no DMARC record was found, but I added it
DNS changes can take up to 24–48 hours to propagate. Wait, then verify again. If it still
fails, re-open the record at your provider and confirm the host is exactly _dmarc with
no doubled domain name and no missing underscore.
My own email started bouncing after I changed the policy
You tightened the policy before every legitimate sender was authenticated. Set the policy back to
p=none, confirm each service that sends as your domain is properly set up, then step
forward again.
My provider will not let me save a record starting with an underscore
Some interfaces strip it. Try entering it again and re-reading the saved record. If your provider genuinely does not support it, contact support@leadcenter.ai.
I already have a DMARC record from a previous service
Keep it. Do not add a second. Make sure your LeadCenter sending domain is verified so LeadCenter email passes your existing policy.
Frequently Asked Questions
Do I need DMARC to send email from LeadCenter?
You can send without it, but we strongly recommend it. It protects your domain from being spoofed and improves how mailbox providers treat your mail.
Will DMARC stop all spoofing of my domain?
It stops attackers from forging your exact domain in the From address, which is the most damaging form. It cannot stop lookalike domains, so still train your team to check addresses carefully.
Who should own this: me or my IT provider?
Adding the record LeadCenter gives you is straightforward and you can do it yourself. Tightening
the policy beyond p=none is a decision worth making with whoever manages your other
email systems.
What’s Next
Your email setup is complete. Continue with Managing Users, or go back to Getting Started: Set Up Your LeadCenter Account to see what is left.
Need help? Email support@leadcenter.ai.

Need more help?
If you can't find the answers you're looking for, our support specialists are available to answer your questions and troubleshoot if necessary.
-
Phone Call (888) 291-7116. Our main hours are Monday to Friday 7 am-5 pm Central Time.
-
Support Send your questions and inquiries via email to support@leadcenter.ai. A support ticket will be created and one of our team members will get back to you as quickly as possible.