 Help Center
Event Marketing
Event Registration Workflow and Confirmation Emails & Text Messages
LeadCenter can automatically send event confirmations and reminders by email, text message, or both. You can control which messages send at each stage of the event workflow and choose which shared email address sends confirmation and reminder emails.
Where to Configure Event Confirmations and Reminders
- Go to the Events page.
- Create a new event or open an existing event.
- Use the left sidebar to open Confirmations or Reminders.
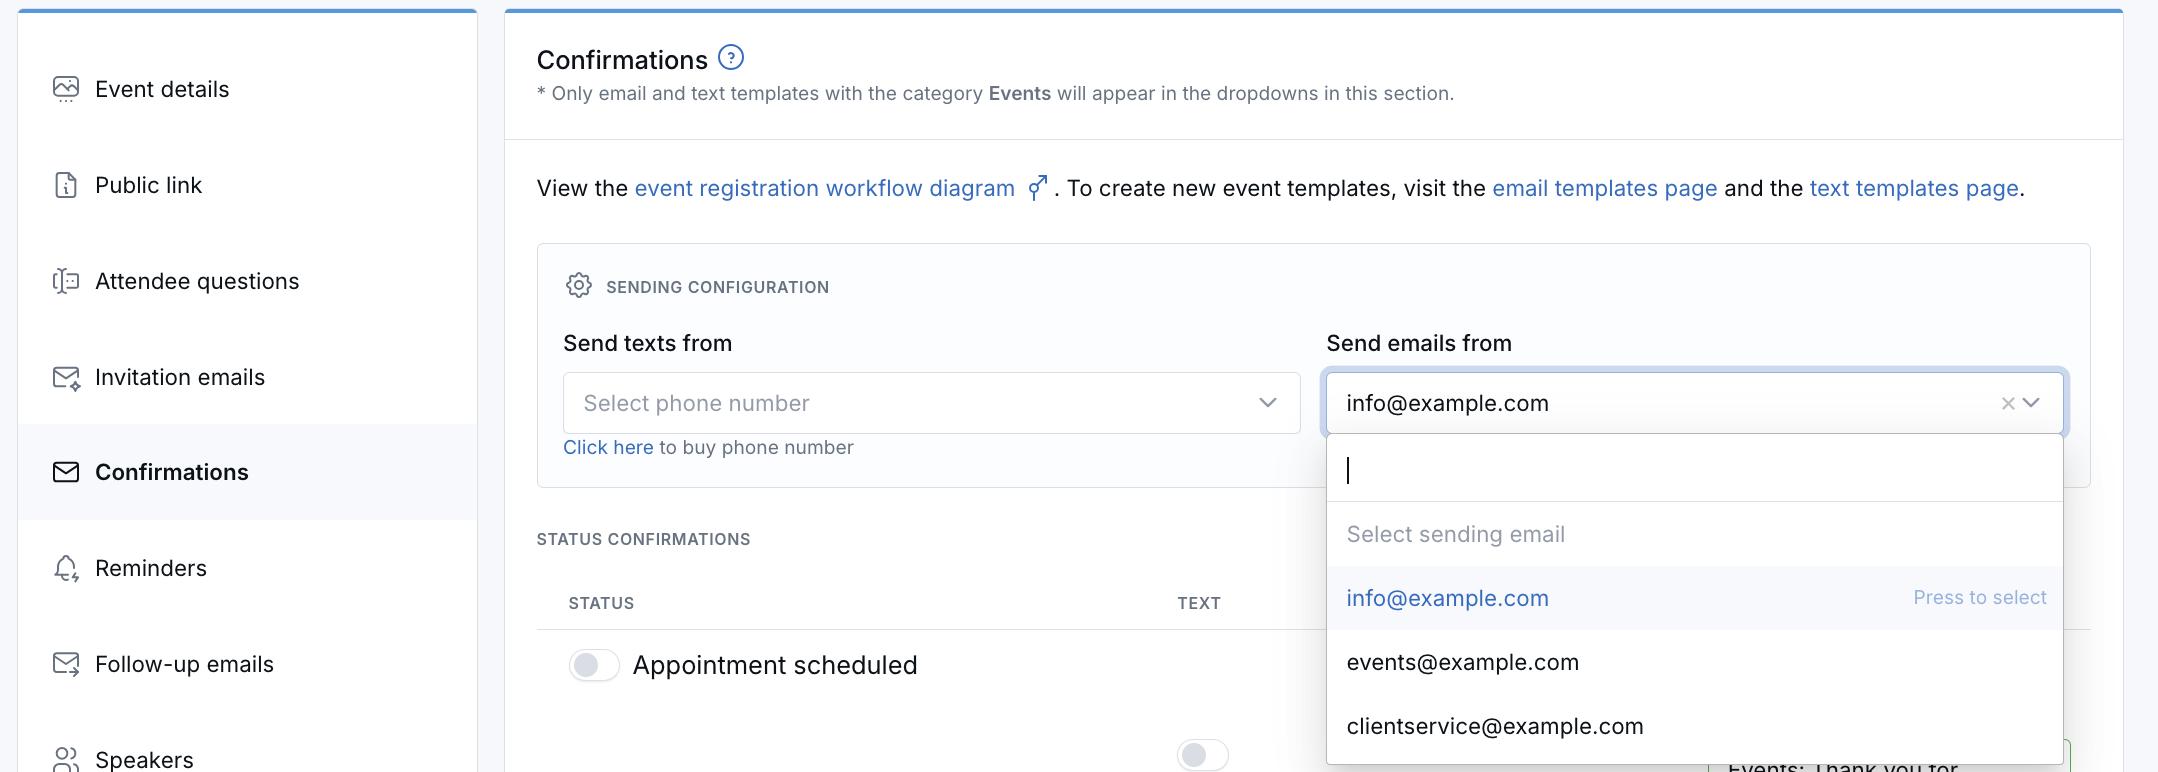
Each tab has its own Sending Configuration section where you choose the email sender and the phone number used for text messages.
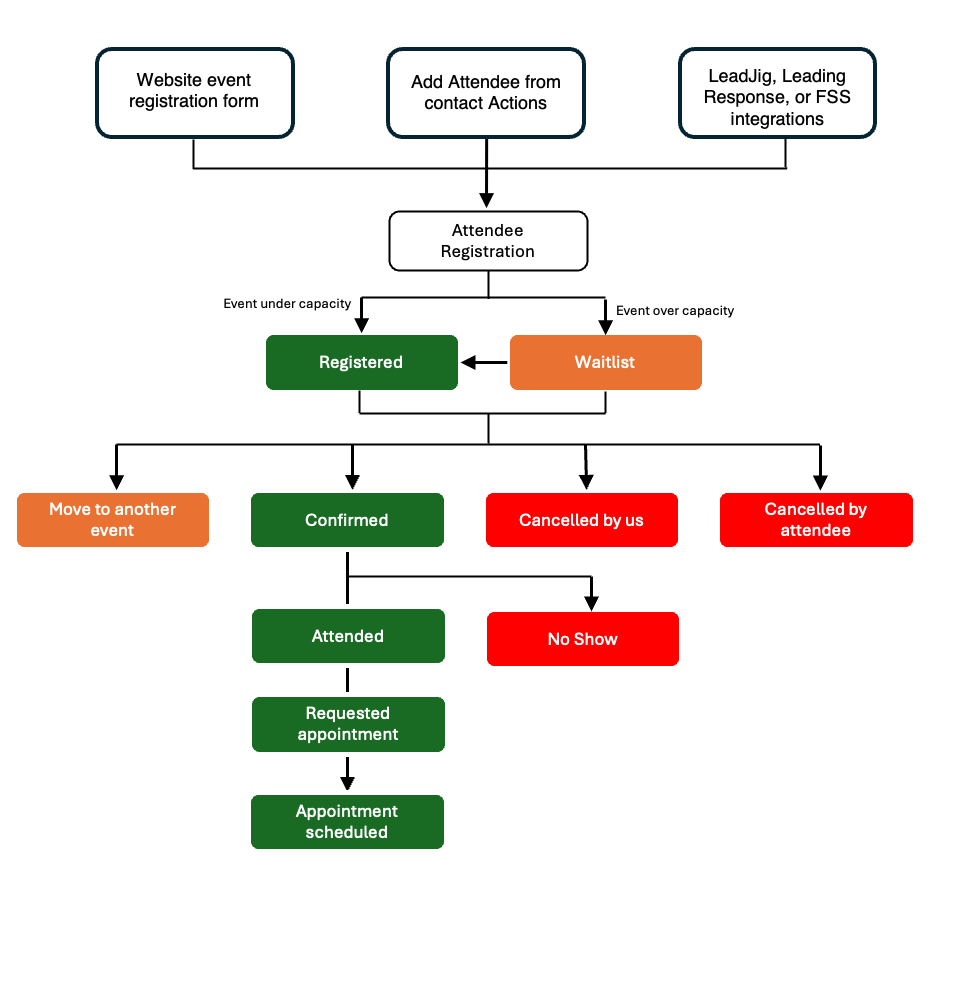
Event Registration Workflow
LeadCenter uses a status-based attendee workflow. Confirmation messages can be sent automatically when an attendee moves into a specific registration status. Reminder messages can be sent before the event based on the reminder schedule you configure.
Choose Which Email Sends Confirmations and Reminders
In both the Confirmations and Reminders tabs, use the Send emails from dropdown in the Sending Configuration section to choose the sending email address.
- Open an event.
- Click Confirmations or Reminders in the left sidebar.
- In Sending Configuration, select an email from Send emails from.
- Click Save.
Tip: Confirmations and reminders are saved separately. You can use one email for confirmations and a different email for reminders.
What Emails Appear in the Dropdown
The dropdown shows all shared email configurations from Settings → Email Configuration, including:
- LC email marketing verified emails
- Microsoft 365 connected accounts
- Gmail connected accounts
- SMTP configurations
Personal email configurations assigned to an individual user do not appear in this dropdown. If you need a different sending email, add it in Settings → Email Configuration first, then return to the event.
Note: If no email is selected, LeadCenter uses the account’s default email configuration.
How Status-Based Confirmations Work
The Confirmations section is organized by attendee status. For each status, you can:
- Turn that confirmation on or off
- Enable Email and select an email template
- Enable Text and select a text template
- Use email only, text only, or both
When an attendee moves into that status, LeadCenter sends the enabled confirmation message or messages for that row.
Example: You can send an email and text when someone becomes Registered, but send only an email when someone becomes Cancelled by attendee.
How Reminder Messages Work
The Reminders tab controls messages sent before the event. You can choose which reminder messages are active, which templates they use, and which email address or phone number sends them.
Reminder settings are separate from confirmation settings, so you can manage them independently.
Layout in the Confirmations and Reminders Tabs
The event editor groups these settings into clear sections:
- Sending Configuration — Choose the phone number for text messages and the email address for email messages.
- Status Confirmations or Reminder Settings — Turn individual messages on or off and assign templates.
- Attendee Move — Available in the Confirmations tab for notifications when attendees are moved between events.
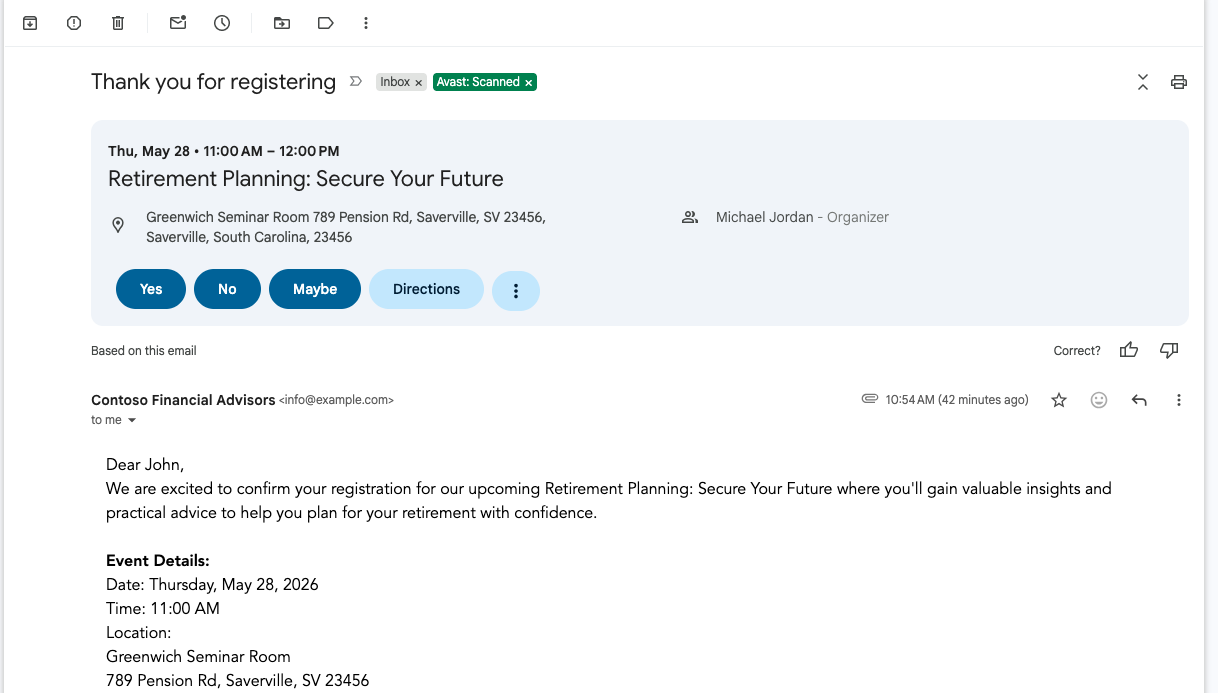
Calendar Invite (.ics File) in Event Confirmation Emails
Confirmation emails for attendees in the Registered and Confirmed statuses include a calendar invite attachment (.ics file). This lets attendees add the event to Google Calendar, Outlook, Apple Calendar, and other calendar apps.
How It Works
If your event has an email confirmation template configured for the Registered or Confirmed status, LeadCenter automatically attaches an .ics calendar invite to that confirmation email. No separate setup is required beyond configuring the confirmation email template for that status.
The calendar invite is sent as an add-to-calendar entry, not as a meeting request with RSVP tracking. Attendees can add the event to their calendar, but they are not prompted to accept or decline the event.
Presenter and Host Notifications
Presenters and hosts are not listed as attendees on the calendar invite. This prevents Google Calendar, Outlook, and Apple Calendar from sending presenters notification emails when an attendee adds the event to their calendar, forwards it, or interacts with it in their own calendar app.
Registrations are still tracked inside LeadCenter as usual. This calendar invite behavior only affects calendar app notifications; it does not change the attendee list, event reporting, or registration workflow.
Which Statuses Receive the Calendar Invite
- Registered
- Confirmed
Other statuses such as Waitlist, Cancelled, No Show, or Attended continue sending their normal emails without a calendar invite attachment.
Please note: The calendar invite is attached only to confirmation emails for the Registered and Confirmed attendee statuses.
What Is Included in the Calendar Invite
- Event name
- Date and time
- Timezone
- Description
- Location, if configured
- Virtual meeting link, if configured
Requirements
- The event must have a start date and end date
- An email confirmation template must be configured for the Registered or Confirmed status
- The attendee must have a valid email address
Override Confirmations When Manually Changing Status or Adding Attendees
When you manually change an attendee’s status or add a contact to an event, you can override the event’s default confirmation settings for that action.
By default, these options follow the event’s settings in the Confirmations tab. If a default template exists for the selected status, the matching toggle starts turned on and the template is pre-selected. If no default template exists, the toggle starts turned off.
When Changing an Individual Attendee’s Status
- Open the event attendees list.
- Click the attendee’s status badge.
- In the change status pop-up, select the new status.
- Use the Send confirmation email and Send confirmation text toggles.
- If a toggle is turned on, you can choose a different template.
- Click Save.
When Bulk Changing Attendee Status Inside One Event
- Open a specific event’s attendees list.
- Select one or more attendees.
- Click Change status.
- Select the new status.
- Adjust the email and text toggles and template selections if needed.
- Click Save.
When Adding a Contact to an Event
- Open the Add contact to event pop-up.
- Select the event, contact, and attendee status.
- Review the email and text confirmation toggles.
- Optionally change the selected templates.
- Click Save.
Where This Manual Override Is Available
- Event Attendees List — individual and bulk status changes, plus add contact to event
- All Attendees List — individual status changes and add contact to event
- Events List — add contact to event
- Contact Details Page — add to event and change attendee status
Note: Bulk template selection is available only from a single event’s attendees page, where the event is known. On the All Attendees page, bulk status changes continue using each event’s default confirmation settings.
How Attendees Can Be Added to an Event
If a confirmation template is configured for a status, it can send regardless of how the attendee was added to the event.
- Your website event registration form
- The contact page Actions menu
- LeadJig integration
- LeadingResponse integration
- Financial Seminar Services integration
What Happens After Someone Registers
- If the attendee does not already exist in LeadCenter, a new contact can be created.
- If confirmed seats are available, the attendee can move into Registered and receive the configured confirmation for that status.
- If confirmed seats are not available, the attendee can move into Waitlist and receive the configured confirmation for that status.
- You can also use reminder emails, reminder texts, and follow-up emails separately if those are configured on the event.
How Capacity and Waitlist Work
When an event has a capacity set, only attendees who hold a confirmed seat count toward that limit.
- Counted toward capacity: Registered, Confirmed, Attended, and similar active statuses.
- Not counted toward capacity: Waitlist, Cancelled, and No Show.
This allows waitlisted attendees to remain on the event without filling the venue. New registrations and guests can still be marked Registered when confirmed seats are available.
Financial Seminar Services Registration Updates
If you use Financial Seminar Services (FSS), LeadCenter updates attendee statuses based on registration updates received from FSS.
- If FSS moves an attendee between its internal waitlist and registered event tracks for the same seminar, LeadCenter updates the attendee status without sending a cancellation email for the internal transfer.
- If FSS sends the same status the attendee already has, LeadCenter does not send a duplicate status email.
- If the attendee's status actually changes, such as Waitlist to Registered, LeadCenter sends the configured confirmation for the new status.
Manual status changes in LeadCenter, such as approving a waitlisted registrant, continue to follow the event's confirmation settings.
If unexpected attendee emails are sent after a manual approval, contact support with the attendee name, event name, and approximate time of the status change.
Select a Phone Number for Text Messages
In the Sending Configuration section, select the phone number that should send text confirmations or text reminders.
Tip: The phone number setting is separate from the email sender setting. You can choose them independently in both the Confirmations and Reminders tabs.
Attendee Move Confirmations
If you use the attendee move feature to move someone from one event to another, you can optionally send a confirmation for that action from the Confirmations tab.
Frequently Asked Questions
Can I use a different email for confirmations and reminders?
Yes. Each tab saves its own email sender independently.
What happens if I do not select an email?
LeadCenter uses the account’s default email configuration.
Can I use a personal Microsoft 365 or Gmail account?
Only shared email configurations appear in the dropdown.
Does this affect text message sending?
No. The email sender and text sender are configured separately.

Need more help?
If you can't find the answers you're looking for, our support specialists are available to answer your questions and troubleshoot if necessary.
-
Phone Call (888) 291-7116. Our main hours are Monday to Friday 7 am-5 pm Central Time.
-
Support Send your questions and inquiries via email to support@leadcenter.ai. A support ticket will be created and one of our team members will get back to you as quickly as possible.