 Help Center
Event Marketing
Event Marketing
Customize Columns on the Event Attendees Page
You can personalize the Event Attendees table by choosing which columns are displayed and arranging them in the order you prefer. This helps you focus on the information that matters most to your workflow.
How to Access the Event Attendees Page
- Go to the Events page.
- Open the event you want to review, or click the attendee count to open that event’s Attendees page.
- On the Attendees page, click the Columns button in the top-right area, to the left of Filters.
How to Customize Columns
- Click the Columns button.
- A modal opens with two sections:
- Available columns — columns not currently shown in the table
- Displayed columns — columns currently visible in the table
- Drag columns between the two sections to show or hide them.
- Drag columns up or down within Displayed columns to change the order.
- Click Save.
Available Columns
You can show or hide columns such as:
- Peek
- Registration Status
- Registration Date
- Sales Pipeline Stage
- Sales Pipeline Close At
- Guests
- Previous Events
- Client Status
- Client Since
- Notes
- Meal
- Source Type
- Promocode
- Questions
Locked Columns
Some columns are always visible and cannot be removed or reordered:
- Checkbox
- Actions
- #
- Attendee Name
Notes Always Appear in More
The Notes field is always available in the More section for each attendee row, even if you choose to display the Notes column in the main table.
This makes it easier to read the full attendee note without depending only on the shortened version shown in the table.
- If the Notes column is hidden — notes appear in More
- If the Notes column is visible — notes appear in both places:
- in the main table as a shortened value
- in More as the full note text
Note: Unlike other hidden fields, attendee notes remain available in More even when the Notes column is already shown in the table.
Sort the Attendee Table
Select a sortable column header to reorder the attendee list. Select the same header again to switch between ascending and descending order.
- The active direction is highlighted in blue. Gray arrows indicate that the column is not the current sort.
- The existing sort dropdown remains available and stays synchronized with the column-header selection.
- The current sort is included in the page URL, allowing you to bookmark or share the sorted view.
Event Attendees Page
- Attendee Name sorts by the contact's last name. Blank last names appear first in ascending order.
- Registration Date
- Client Since, when displayed through the Columns picker
- Sales Pipeline Close At Date, when displayed through the Columns picker
All Attendees Page
- Client Since
- Sales Pipeline Close At Date
Date columns sort from oldest to newest on the first selection and newest to oldest on the second. Attendees without a date are grouped at one end of the list.
Default Columns
The first time you open the Event Attendees page, LeadCenter shows these columns by default:
- Peek
- Registration Status
- Registration Date
- Sales Pipeline Stage
- Sales Pipeline Close At
- Guests
- Previous Events
Remove a Promocode from an Attendee
Use Remove promocode when a code was applied by mistake, is no longer valid, or should not remain on an attendee's registration.
Open your events from Seminars on the Sales & Operations dashboard, or Events on the Marketing dashboard. The action is available from the attendee row's Actions menu anywhere attendees are listed:
- An individual event's Attendees list
- The combined Attendees list across events
- A contact's Events tab
- Open an attendee list and find the attendee.
- Open the row's Actions menu.
- Select Remove promocode.
- Confirm the change.
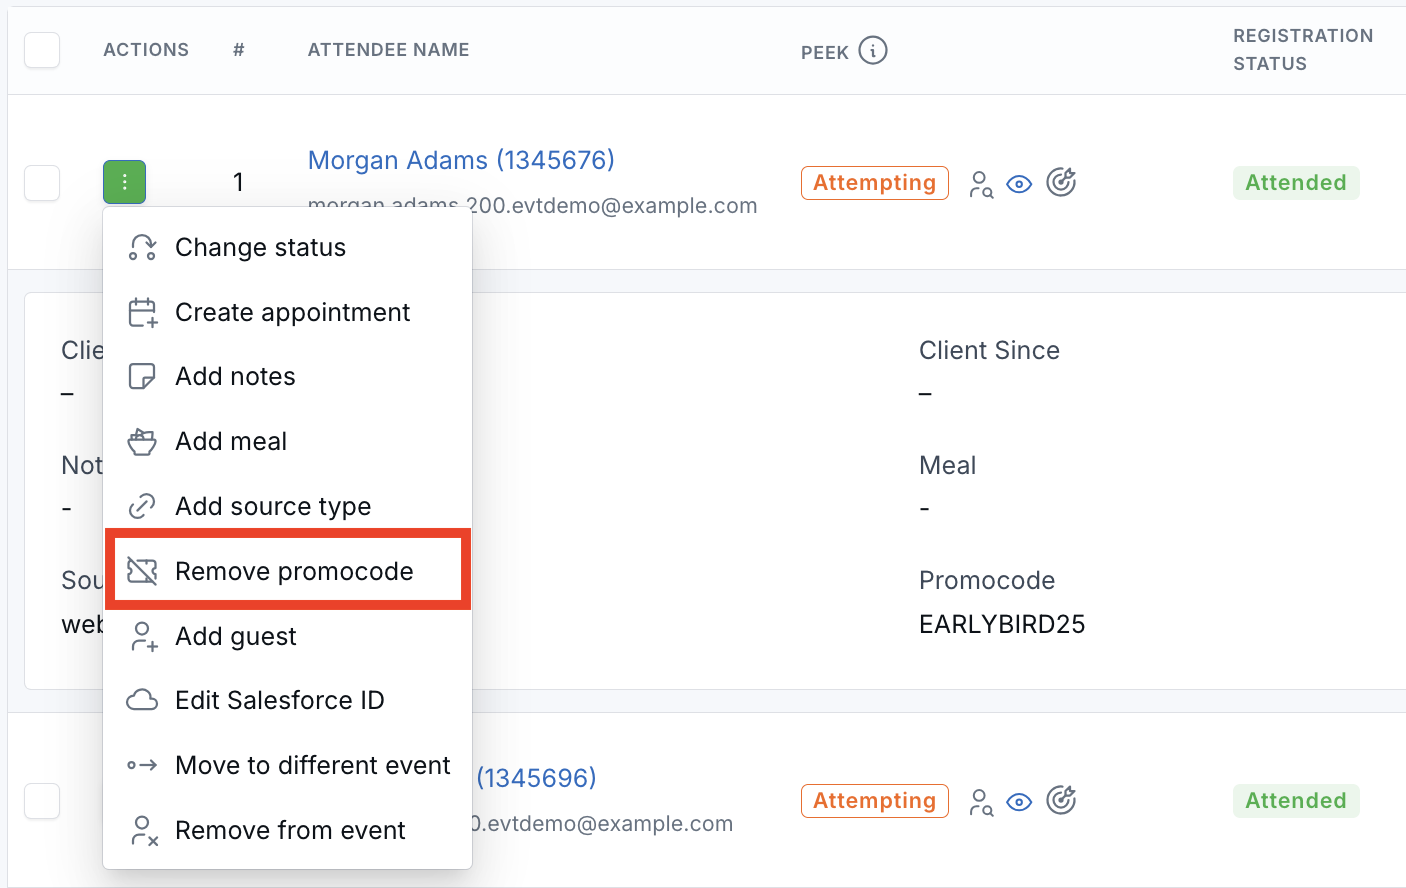
The attendee list refreshes and the promocode is cleared. You can apply a different code later with Add promocode.
Remove promocode appears only when the attendee has a promocode. Check the Promocode column or the expanded row if the action is unavailable.
- The attendee remains registered for the event.
- Registration status, meal, notes, and source type are not changed.
- The action does not apply or reverse billing or ticket pricing outside LeadCenter.
Important Notes
- Your column preferences are saved per user.
- Other team members’ attendee table views are not affected.
- Your preferences are remembered across sessions, so you usually only need to set them once.
- You can change your column setup any time by clicking the Columns button again.
When to Use This Feature
- Show fewer columns when working quickly through attendee follow-up
- Move important columns closer to the left side of the table
- Hide less-used fields while still keeping them available in More
- Create a cleaner attendee management view for your own day-to-day workflow
Need help? Contact support@leadcenter.ai.

Need more help?
If you can't find the answers you're looking for, our support specialists are available to answer your questions and troubleshoot if necessary.
-
Phone Call (888) 291-7116. Our main hours are Monday to Friday 7 am-5 pm Central Time.
-
Support Send your questions and inquiries via email to support@leadcenter.ai. A support ticket will be created and one of our team members will get back to you as quickly as possible.